This blog has moved! Please visit my new website:

Showing posts with label decorative paper. Show all posts

From sketching to screenprinting: A unique Coptic bookbinding project

>> Sunday, July 7, 2013
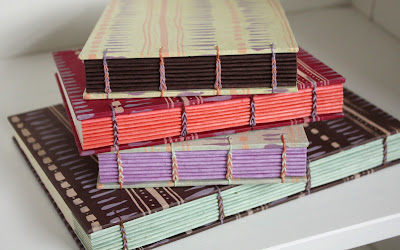
handmade books screenprinted by Katie Gonzalez
It's no secret that I'm enamored with decorative and handmade papers. After all, the name of my studio, linenlaid&felt, is all about paper textures: linen, which is embossed with distinctive weaves; laid, which features impressed lines; and felt, with its mottled texture.


However, even with all of the gorgeous papers that are available, some patterns do surface often in bookbinding. That's why I'm so excited to share one of my recent projects.

I wanted to create something really unique, that no other book artist would have. I wanted to create my own patterned papers. This would allow me to bind books with all of the materials purposefully chosen, right down to patterns that I illustrated and printed by hand.

Inspired by a recent exhibit at The Frist Center in Nashville, I completed a series of sketches, followed by inked illustrations, then screenprinting onto papers and leathers, and finally books bound with those materials. A handful of these unique books are now available in my Etsy shop.

Here's a look at the process, step by step.
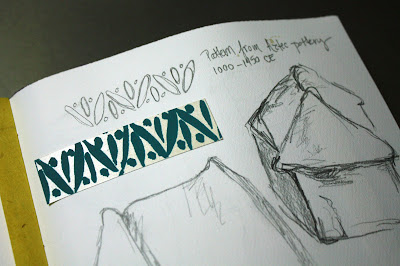
Aztec pattern sketch from Frist Center
Step One: Sketching
Inspiration first struck during a visit to the Frist's Art of the Ancient Americas exhibit. I think I've always enjoyed ancient art more than most friends my age, perhaps because of the incredible collection that I grew up visiting at the Art Institute of Chicago.

After seeing the exhibit and a guided tour one time, I returned with my sketchbook (yes, one that I made by hand) and got to work on some sketches. I captured some shapes from Peru, took interest in a ceramic llama, and took a few turns drawing some Mexican homes. Ultimately, an Aztec pottery pattern was among many inspirations blended into patterns.

ancient patterns by bookbinder Katie Gonzalez
Step Two: Ink illustrations
On the day I pulled out my India Ink it didn't take long for every surface in my studio to become filled with illustrations that needed to dry. For some, I worked meticulously with a pencil grid, but for others, I worked very quickly, making slashes, dotted and dashed lines, and vaguely organic shapes.

screenprinted handmade papers
Step Three: Screenprinting
If you've never screenprinted before, I can briefly describe the process. First, I turned my inked illustrations into transparencies using a photocopier. The transparency is then placed onto one of the fine mesh screens used by printers, which has been treated with light-sensitive emulsion. The screen is then exposed to light, which burns the pattern into the screen. When it comes time to print, ink can only pass through the areas you've chosen based on your pattern.

I took care to mix my own inks in colors to coordinate with all of the handmade Lokta papers that I brought into the print studio for this project.

I printed nearly 100 sheets and also dabbled with screenprinting onto leather.

screenprinted handmade journal by Katie Gonzalez
Step Four: Binding
Once I had all of these materials at hand, I had a lot of momentum to begin binding. I also used this as an opportunity to sift through my paper collection to explore color combinations. I also decided to use the four-needle Coptic binding style, which allows for two thread colors along the spine, and a chance to go even further with color schemes while quite literally bringing everything together.

I'm excited to use these screenprinted papers in the future. For now, I've bound four Coptic books with the screenprinted papers, and four with screenprinted leather covers. I hope you'll take a look at each one in the shop and share them with friends!

Read more...

A wedding album to hold Polaroid photos of guests

>> Tuesday, October 2, 2012

Japanese stab binding hardcover thread

Picture this: a little table at your wedding that holds a Polaroid camera and your guest book. Your best friends and family members snag the camera, take awesome photos, and immediately mount them into the book and write messages to mark the day.

This particular book was made just for that purpose.  I've found that more and more brides are opting for something a besides a traditional book with lined pages in which guests merely sign their names.  Rather, a book with more space for guests to leave messages and plenty of room for photos leads to a more meaningful keepsake, and one that's more likely to be treasured and enjoyed long after the festivities are over. 


Another exciting thing to note about this book is that it was just featured in Nashville Lifestyles Weddings magazine among their round-up of "lovely local details."  The most recent issue is on newsstands now, so if you're in the Nashville area pick up a copy and check out all of the local talent in our city. 


Aside from binding books and scoring magazine features (this is my second one of the year; check out the first one here), I've been busy applying to art shows, planning new classes, and filling my Etsy shop to the brim.  

Be sure to take a peek at my latest e-newsletter to find out about all the exciting events I have coming up this fall.  (You can sign up for my mailing list to ensure that you'll never miss out on my beautiful, informative e-mails packed with gorgeous photos.)  My busy season is starting off with the Handmade & Bound book arts festival this weekend. I hope to see you there!

Read more...

A sweet gray and yellow baby book

>> Monday, September 24, 2012

Handmade book with Japanese stab binding and floral print

If you've been looking around lately (hint, hint, on Pinterest) you're probably familiar with "grellow." That's the chic gray and yellow combination that's as popular in home decor as in fashion. This book takes that scheme and glams it up with silver accents in one of my favorite handmade papers.

Floral print paper handmade book

This baby book was made for a little girl named Zoe, and in my opinion, she has one of the prettiest baby books around.  The paper used for the covers was made in India from natural plant materials, and was printed with a yellow floral pattern.  Depending on the way the light hits the book, the silver outline around the flowers shimmers.  The hinged spine edge of the book is covered with a grey linen bookcloth that I made myself, and the book is sewn together with a sunshine yellow ribbon using the Japanese stab binding. 

Custom handmade baby book

I designed the pages of the book to coordinate with the yellow and gray color scheme, and handmade photo corners are attached to each photo spot so pictures can easily be added to the book.  There are pages for Zoe's parents to record all of the important details, starting with pregnancy memories and baby showers, and spanning through the delivery, her baptism, important milestones, and holidays. There are also pages for a family tree, for handprints and footprints, and for Zoe to write a message to the future on her fifth birthday. 

Handmade baby book


Handmade baby book family tree


Japanese stab binding with ribbon

Read more...

A colorful bouquet of birthday books

>> Tuesday, April 17, 2012

Hanmade books for birthday gift


I recently received an interesting request from a customer that resulted in a trip to Franklin, TN with a collection of colorful books.  The customer from Georgia came across my website while searching for bookbinders in the Nashville area.  Her dear friend's birthday was approaching and she wanted to surprise her with a special delivery of little handmade books.  

We selected a cheerful assortment of little books that I bundled together with a bright orange bow and placed in a gift bag with a sweet handwritten note. Then I set off for historic downtown Franklin (just south of Nashville and home to lots of famous musicians and celebrities). The birthday girl was thrilled with her surprise delivery of miniature books, and she invited me into her beautiful home so I could tell her all about the different handmade creations. 


The birthday "bouquet" of books included four single-signature pamphlet books, one double-signature pamphlet, one softcover book sewn with the Japanese stab binding, an Italian longstitch journal with a red suede cover, a grey-and-orange hot air balloon book sewn onto cords, and a hardcover Coptic book with a Japanese waves paper used for the covers. I had such fun putting together this set of books, and it was a great excuse to make a trip to Franklin too. What a clever idea for a birthday gift!

Handmade books gift

Read more...

Made with love for my dad

>> Thursday, September 15, 2011


Today is my dad's birthday, so it seems like as good a time as any to share some more details about the photo album that I gave him for Christmas.  

My dad started to get interested in photography back when I was in high school taking some photography classes.  I taught him some of the basics, and he started incorporating the rule of thirds into almost all of his pictures (including lots of off-centered pictures of me at graduation).  But since then, he has become a really talented photographer with a great eye for capturing unusual sites around the historic city of Charleston, South Carolina.


Each time I would come to visit, my dad would pull out his camera and to show me his latest pictures.  I'd flip through one by one admiring his work on the tiny camera display screen and wonder why he never made prints of any of his photos.  Showing them off in this way just didn't do the pictures justice, so I decided that he needed a better way to display them.


After I gave him the book, my husband and I helped my dad pick out all of his favorite photos and we added them to the book with photo corners. He's taken some great photos like the one above where he chose to photograph the back of a statue, or some complex reflected images inspired by my photos of store window reflections.  I'm glad that he now has a proper way to display his pictures, and I'm sure he'll soon be ready for a companion album to store his newest shots. 

Read more...

Making paper by hand

>> Saturday, September 3, 2011


I've been taking over the house once again with my latest creative project -- papermaking.  (Thankfully my husband doesn't seem to mind, and he even stepped in to take some photos of the process so I could share them here.)  

I met a local bookmaker, Laura, here in Nashville soon after moving to town.  We then met up for coffee to chat about books and new techniques we wanted to try.  We decided that papermaking should be our first project and we wasted no time with getting started.  We made these lovely lavender sheets of paper last week, and we've since made a new batch of raspberry-sherbet-colored paper and have several bags of paper pulp in my fridge prepared for our next papermaking adventure.  

The bowl above is filled with little torn-up scraps of paper leftover from making books.  For about a week, I collected all of the little bits of paper that were too small to be reused.  Then I soaked them in water for about 12 hours.  Then Laura and I blended the paper scraps into pulp using her smoothie maker that she donated to the papermaking cause ("the sacrificial blender," as my husband called it).  


Unfortunately, I didn't get any pictures of the blended paper pulp this time.  You might expect it to look like a gross and gooey mess.  But it's surprisingly soft and has a really luxurious feel to it.  It's actually quite nice to dip your hands into it during the process.  

Next, we added our pulp to a large vat of water.  Then we'd dip our mould and deckle (made by Laura!) into the vat to pull a sheet of paper.  With each sheet I pulled, I loved seeing the assortment of speckles and flecks of paper that happened to make it onto the mould because they remind me of the books I'd made with those different decorative papers.  


After pulling the sheets, we'd press them from the mould onto pieces of cloth, and eventually set them out to dry in my living room.  (It's been much too humid to dry them outside.)  It took about a day for the sheets to dry completely.  Once dry, Laura and I got together again to gently peel our sheets of paper off of the cloths.  


And here's the end result:


We experimented with using different types of cloth to press our wet sheets of paper on to dry.  The textures of the cloth effects the final texture of the paper.  You can see an examples of the different textures below.  We used linen, felt, and cotton to achieve different textures.  The sheet on the left was pressed onto felt; the sheet in the center was pressed onto linen, and the sheet on the right was pressed to a wrinkly piece of cotton.  We also experimented by rolling wet sheets of paper onto plexiglass, which yielded an incredibly smooth texture. 

I love textured paper.  In fact, such textures are the namesake of my business: linenlaid&felt.  (You can read more about that in the FAQ section of my website.)  While commercially-made papers of these names are made to resemble the textures of these cloths, making paper by hand allowed for us to create these textures ourselves.  Laid paper refers to the lines impressed by certain types of papermaking molds, like those that I used in Italy.  


Both Laura and I have already put our new sheets of handmade paper to use.  I made two Italian longstitch journals last week with suede covers and pieces of our handmade paper as decorative accents inside.  It has been a while since I've made a book for myself.  I'm typically busy working on custom orders, books for my shop, or gifts for friends, so I decided to take the time to make a book just for me. 


The book on top is the one I've decided to keep.  Because these books have the suede straps that wrap the book and keep it shut, it will be the perfect portable book to keep with me to jot down notes on the go.  And as an added bonus, I'll always have an example of my work with me to show as a response to the blank stares I often get when I tell people that I'm a bookbinder.  The other book that I made (the one bound with lavender thread) is now for sale in my etsy shop.  


Laura kindly made a monogrammed bookmark for me using the paper that we made together.  She makes the most adorable miniature books and book jewelry, and she will also be selling her work at the Handmade & Bound festival in a few weeks.  I love seeing the little purple pages peeking out from the little book and knowing that our handmade paper is going to good use.  


Read more...

Handmade baby books with a personal touch

>> Tuesday, August 23, 2011


Much of what I've been working on in the studio lately has been custom work. I've made quite a few wedding guest books and photo albums this summer, but personalized baby books have been keeping me busy these past few weeks. I wanted to show off a few of the details that make my baby books extra special keepsakes.


I showed a little sneak peek of this particular baby book on my blog a while ago, but never officially unveiled the final product. My husband and I collaborated to write the book, and then I designed it. I added little envelopes to hold Abigail's hospital bracelets and a lock of hair from her first haircut. I also constructed handmade photo corners from coordinating paper to hold treasured photographs in place.


Because every baby book is made individually, I can customize each detail. Parents can select the color scheme of the book, from the decorative paper used for the covers and the ribbon or thread used to bind the book together, down to the colors of the printed pages. 

This particular book uses a light pink cherry blossom paper for the cover, satin ribbon for the binding, and pink printing on the pages. I've also made some baby books recently using handmade, rustic papers and using bright modern prints for a completely different feel. 


I include the baby's name throughout the text of the book, creating a personal effect that can't be matched with store bought baby books. And the nameplate on the front cover can be customized to include the baby's name, birthday, or any other message.


While I have a standard selection of pages that I typically use in my baby books, I can add extra pages if there's something specific you'd like to include. I've added pages to include religious traditions, for grandparents to have extra space to share their words of wisdom, and to accommodate multiple baby shower invitations. I can add extra pages for siblings or pets. And I've even designed a special version of the book for twins. 


If you're interested in ordering a custom baby book, please visit my etsy shop. Or for more information, you may e-mail me at linenlaidfelt {at} gmail {dot} com. And check back soon for photos of my other handmade baby books here and on my facebook page. 

Read more...

A wedding memory book for Tiffani and Nathan

>> Friday, July 8, 2011


In my last post, I shared a few photos of this guest book that I made for my best friend's wedding.  My husband was able to take a few pictures of guests signing the book at the reception, but I also wanted to include some pictures of the book's details.  

I still haven't tired of this gorgeous marbled paper, and it was a perfect fit for her oceanside wedding ceremony in Hilo, Hawaii.  I purchased a large sheet of this paper, and then carefully selected my favorite portions to use for the covers this book.  I like how the swirling patterns on the front and the back of the book each seem to have a different personality.  


I was pleased to see that many of the guests took the time to write lengthy, heartfelt messages.  By the end of the wedding, the pages were filled with well-wishes (in several languages!).  I prefer using blank pages in my guest books, instead of lined pages, because I think the blank canvas of the page invites guests to do more than just sign their names. I love flipping through books and seeing elaborate messages in elegant cursive mixed in with light-hearted doodles and more casual congratulatory notes.  This variety adds such character to the book and makes it so much fun to flip through years later. 


I also made a large set of photo corners to accompany this book.  The opening page of the book was reserved for Tiffani and Nathan to display their favorite wedding photo.  On the second page, I included one of their wedding invitations.  And then on the rest of the pages that weren't filled with guests messages, they can add more photos from their wedding.  I think this guest-book-plus-photo-album is the perfect solution to keep all of their wedding memories together in one handmade keepsake. 


Congratulations, Tiffani and Nathan!  I wish you all the best in your adventures together. 


Read more...

  © Blogger templates Shiny by Ourblogtemplates.com 2008

Back to TOP