This blog has moved! Please visit my new website:

Vacation photo on display

>> Wednesday, September 28, 2011

The newest addition to our new apartment in Nashville is this tropical flower canvas print.  I was contacted by the folks at Easy Canvas Prints, a photos to canvas company, who asked me to review their product in exchange for a canvas print of my own.

I chose a photograph I took at Hawaii Tropical Botanical Garden on a recent trip to Hilo, Hawaii for my best friend's wedding.  The botanical garden was truly a wonderland, filled with waterfalls, ocean views, an orchid garden, tropical birds, and so many varieties of plants that I'd never seen before.  I was snapping photos non-stop during my visit (you can see some of my other botanical photos in my flickr photostream) and I was looking for a way to display some of my favorites once returning from our trip.  This canvas print was just what I needed.  


Ordering a canvas from EasyCanvasPrints.com really is, as the name suggests, easy.  The website is simple to use, and it guides you through the step-by-step process of designing your own canvas.  And this handy guide shows all of the options and pricing so you can pick out exactly what you want.  

You can choose any sized canvas (mine is 8" x 10"), and you can either upload your own photograph like I did or you can choose an image from their gallery.  You also have the choice of upgrading to a thicker canvas or opting for photo retouching.  For the edges of the canvas, you can have your image wrap onto the edges or you can select a solid color for the border. 


I opted for a bright orange border for the edges of my canvas.  My print is displayed against lime green walls in my apartment, and I wanted it to tie into colors of the room but still pop against the wall color.  I debated the borders of my canvas for a while before placing my order.  I really like the look of the canvases where the images continues onto the edges, and I think I would probably choose that option next time, but for this particular print the bright orange border worked out best.

The option of wrapping the image around to the edges of the canvas would be best for a picture with a background that's not crucial to the composition.  If you choose this option, the photo will appear slightly larger on the front surface of the canvas so there's enough leftover to wrap.  I didn't think the composition of the tropical flower photo was quite as strong once the whole image wasn't visible on the main surface of the canvas.  The orange border worked out better in my case because I could better control the composition of my print, while adding an extra pop of color.

I do wish there was a better way to select the color for the edges though. It would be a nice touch if the website allowed the option to sample a color directly from your photograph, like you can with the eyedropper tool in Photoshop, rather than choosing a color and hoping it matches.


My husband and I have a fairly extensive art collection (including artwork made by friends, family, and ourselves, as well as original work by professional artists, and a collection of vintage photographs), and we're pretty particular about what we put on our walls.  If we don't love it, there's just not space for it.  That said, we were happy to include this canvas print into our home decor.

And another perk of this canvas is how easy it is to hang on the wall. One nail will do the trick.  My husband and I have lived in four apartments since college, and we've hung our artwork on the walls of each one.  This is by far one of the easiest pieces to hang.

Overall, the vibrant colors and high-quality printing makes it evident that this is a high quality product.  I love having a reminder of our trip to Hawaii on display for me to see each day.  The look of our particular print is contemporary and casual, which is exactly what we wanted for our vacation photo.  But I think these prints could be a great choice for displaying wedding photos too, especially a larger canvas print placed in an elegant frame.  If only I'd known about these two years ago!

Read more...

Handmade & Bound

>> Tuesday, September 27, 2011

Handmade & Bound Nashville logo
The first annual Handmade & Bound book arts festival is just a few days away!  I've been looking forward to this event for months.  It was one of the first things about Nashville I found out about once we knew we'd be moving to town, and I sent in my vendor application before we'd even started packing to leave Virginia. 


I thrilled to be living in a city with a book arts community, and I can't wait to be a part of this event.  In addition to the various vendors selling handmade books and zines, there will be workshops and demos in bookmaking, papermaking, and printmaking, as well as a film screening, a gallery exhibit, live music and food trucks.  


Handmade & Bound Nashville
September 30 and October 1

Friday, September 30

6:30 pm: Opening reception of "Encoded Structures: Interpreting the Story," a juried gallery show of artists' books and zines

8:00 pm: Free Screening of “$100 and a T-shirt," an award-winning documentary on the culture of zine making

Saturday, October 1

Vendors:

10:00 am – 5:00 pm: Vendor booths exhibiting and selling artists’ books, zines, small press publications, and other handmade bookish things.

Demonstrations:

10:00 am – 5:00 pm: Goldsmith Press Demonstration; print your own DIY bag

10:00 am – 11:00 am and 3:00 pm – 4:00 pm: Brown Dog Bindery Demonstration; Jennifer Knowles-McQuistion will demonstrate how wooden books are carved, burned, and bound

10:00 am – 5:00 pm: Gilded Leaf Bindery Demonstration; book restoration, fine bindings, blank journals, and gold tooling

10:00 am – 5:00 pm: Pamphlet Stitch Books for Kids with local printmaker and book artist Lesley Patterson-Marx

Workshops:

10:00 am to 11:00 am: Pixels, Print and Presence: How to Make the Most of Digital When It Comes to Print
This workshop is an introduction to web and digital assets for anyone from a DIY Zinester to Small Press publishers. 

10:00 am – 11:00 am: Findings & Bindings 
Use a discarded book, found papers both old and new, and a simple no-sew binding technique to create a one-of-a-kind handmade journal to house your creative notions.

11:00 am – 12:00pm: Zines with Kids & Teens

11:00 am – 12:00pm: Storytime for Children
Children can make paper finger puppets of the characters to take home.

12:30 pm – 1:30 pm: Miniature Accordion Popup Books
Artist Jennifer Knowles-McQuistion will lead participants through making a miniature hardback accordion book with pages that pop up, spill out, and burst from the folds. 

12:30 pm – 1:30 pm: Toward A Self-Sufficient, Long-Lived Zine
Examine the nuts and bolts of what it takes to keep a serial zine alive and vital. 

1:30 pm – 2:30 pm: Felt Sketchbook
Participants will design their book covers using felt and other materials, such as decorative papers, threads, and beads. Then they will assemble their sketchbooks, binding the books using posts and screws.

2:00 pm – 3:00 pm: The Art of Saying Something Worth Saving
Discussion will cover the pressure language undergoes when we seek to present it in a book arts project, and how words respond and rise to that challenge or collapse under the weight of that attention, and how we recognize it. 

3:00 pm – 4:00 pm: Quadraflip or infinity card
Turning the pages of this structure changes their orientation and reveals hidden pages before taking you back to the beginning. 

3:30 pm – 4:30 pm: Open Mic Zine Readings

All day: Papermaking 
Book artist and instructor Annie Herlocker will guide you through pulling your own sheet of paper from pre-pulped materials.

Read more...

Made with love for my dad

>> Thursday, September 15, 2011


Today is my dad's birthday, so it seems like as good a time as any to share some more details about the photo album that I gave him for Christmas.  

My dad started to get interested in photography back when I was in high school taking some photography classes.  I taught him some of the basics, and he started incorporating the rule of thirds into almost all of his pictures (including lots of off-centered pictures of me at graduation).  But since then, he has become a really talented photographer with a great eye for capturing unusual sites around the historic city of Charleston, South Carolina.


Each time I would come to visit, my dad would pull out his camera and to show me his latest pictures.  I'd flip through one by one admiring his work on the tiny camera display screen and wonder why he never made prints of any of his photos.  Showing them off in this way just didn't do the pictures justice, so I decided that he needed a better way to display them.


After I gave him the book, my husband and I helped my dad pick out all of his favorite photos and we added them to the book with photo corners. He's taken some great photos like the one above where he chose to photograph the back of a statue, or some complex reflected images inspired by my photos of store window reflections.  I'm glad that he now has a proper way to display his pictures, and I'm sure he'll soon be ready for a companion album to store his newest shots. 

Read more...

Making paper by hand

>> Saturday, September 3, 2011


I've been taking over the house once again with my latest creative project -- papermaking.  (Thankfully my husband doesn't seem to mind, and he even stepped in to take some photos of the process so I could share them here.)  

I met a local bookmaker, Laura, here in Nashville soon after moving to town.  We then met up for coffee to chat about books and new techniques we wanted to try.  We decided that papermaking should be our first project and we wasted no time with getting started.  We made these lovely lavender sheets of paper last week, and we've since made a new batch of raspberry-sherbet-colored paper and have several bags of paper pulp in my fridge prepared for our next papermaking adventure.  

The bowl above is filled with little torn-up scraps of paper leftover from making books.  For about a week, I collected all of the little bits of paper that were too small to be reused.  Then I soaked them in water for about 12 hours.  Then Laura and I blended the paper scraps into pulp using her smoothie maker that she donated to the papermaking cause ("the sacrificial blender," as my husband called it).  


Unfortunately, I didn't get any pictures of the blended paper pulp this time.  You might expect it to look like a gross and gooey mess.  But it's surprisingly soft and has a really luxurious feel to it.  It's actually quite nice to dip your hands into it during the process.  

Next, we added our pulp to a large vat of water.  Then we'd dip our mould and deckle (made by Laura!) into the vat to pull a sheet of paper.  With each sheet I pulled, I loved seeing the assortment of speckles and flecks of paper that happened to make it onto the mould because they remind me of the books I'd made with those different decorative papers.  


After pulling the sheets, we'd press them from the mould onto pieces of cloth, and eventually set them out to dry in my living room.  (It's been much too humid to dry them outside.)  It took about a day for the sheets to dry completely.  Once dry, Laura and I got together again to gently peel our sheets of paper off of the cloths.  


And here's the end result:


We experimented with using different types of cloth to press our wet sheets of paper on to dry.  The textures of the cloth effects the final texture of the paper.  You can see an examples of the different textures below.  We used linen, felt, and cotton to achieve different textures.  The sheet on the left was pressed onto felt; the sheet in the center was pressed onto linen, and the sheet on the right was pressed to a wrinkly piece of cotton.  We also experimented by rolling wet sheets of paper onto plexiglass, which yielded an incredibly smooth texture. 

I love textured paper.  In fact, such textures are the namesake of my business: linenlaid&felt.  (You can read more about that in the FAQ section of my website.)  While commercially-made papers of these names are made to resemble the textures of these cloths, making paper by hand allowed for us to create these textures ourselves.  Laid paper refers to the lines impressed by certain types of papermaking molds, like those that I used in Italy.  


Both Laura and I have already put our new sheets of handmade paper to use.  I made two Italian longstitch journals last week with suede covers and pieces of our handmade paper as decorative accents inside.  It has been a while since I've made a book for myself.  I'm typically busy working on custom orders, books for my shop, or gifts for friends, so I decided to take the time to make a book just for me. 


The book on top is the one I've decided to keep.  Because these books have the suede straps that wrap the book and keep it shut, it will be the perfect portable book to keep with me to jot down notes on the go.  And as an added bonus, I'll always have an example of my work with me to show as a response to the blank stares I often get when I tell people that I'm a bookbinder.  The other book that I made (the one bound with lavender thread) is now for sale in my etsy shop.  


Laura kindly made a monogrammed bookmark for me using the paper that we made together.  She makes the most adorable miniature books and book jewelry, and she will also be selling her work at the Handmade & Bound festival in a few weeks.  I love seeing the little purple pages peeking out from the little book and knowing that our handmade paper is going to good use.  


Read more...

A bold and modern guest book

>> Friday, September 2, 2011


I absolutely loved working on this wedding guest book.  Everything seemed to come together perfectly, and I'm so pleased with the end result.  Jill and Rich chose such a bold color scheme for their wedding. The royal blue and bright orange complemented each other so well, as did the different textures of the papers used for this book.

I designed the personalized nameplate on the cover to coordinate with their wedding invitations.  I used the same colors and fonts, and the circular J+R motif was also drawn from their wedding paper goods.  The couple could also attach extra copies of their invitation, ceremony program, and other printed materials into the book as a place to store their coordinated wedding keepsakes after their wedding.

Congratulations to Jill and Rich!  I hope your wedding day was perfect in every way!


Read more...

Handmade baby books with a personal touch

>> Tuesday, August 23, 2011


Much of what I've been working on in the studio lately has been custom work. I've made quite a few wedding guest books and photo albums this summer, but personalized baby books have been keeping me busy these past few weeks. I wanted to show off a few of the details that make my baby books extra special keepsakes.


I showed a little sneak peek of this particular baby book on my blog a while ago, but never officially unveiled the final product. My husband and I collaborated to write the book, and then I designed it. I added little envelopes to hold Abigail's hospital bracelets and a lock of hair from her first haircut. I also constructed handmade photo corners from coordinating paper to hold treasured photographs in place.


Because every baby book is made individually, I can customize each detail. Parents can select the color scheme of the book, from the decorative paper used for the covers and the ribbon or thread used to bind the book together, down to the colors of the printed pages. 

This particular book uses a light pink cherry blossom paper for the cover, satin ribbon for the binding, and pink printing on the pages. I've also made some baby books recently using handmade, rustic papers and using bright modern prints for a completely different feel. 


I include the baby's name throughout the text of the book, creating a personal effect that can't be matched with store bought baby books. And the nameplate on the front cover can be customized to include the baby's name, birthday, or any other message.


While I have a standard selection of pages that I typically use in my baby books, I can add extra pages if there's something specific you'd like to include. I've added pages to include religious traditions, for grandparents to have extra space to share their words of wisdom, and to accommodate multiple baby shower invitations. I can add extra pages for siblings or pets. And I've even designed a special version of the book for twins. 


If you're interested in ordering a custom baby book, please visit my etsy shop. Or for more information, you may e-mail me at linenlaidfelt {at} gmail {dot} com. And check back soon for photos of my other handmade baby books here and on my facebook page

Read more...

Anniversaries, the traditional way

>> Sunday, July 31, 2011


Earlier this month my husband and I celebrated our two-year wedding anniversary. We exchanged gifts made of cotton. Last year, we exchanged gifts made from paper. 

We've decided that we're going to follow the year-by-year categories of traditional wedding gifts. Since I'm a bookmaker, I was especially excited about year one's paper gifts and that's probably why we started off with the tradition. I think the themes make the gift giving so much fun. The materials give us a place to start with the gift-giving brainstorming, and then we get to come up with a contemporary idea to fit within the traditional boundaries.


Last year, Tony surprised me with a little handbound book made by Ruth Bleakley. The book features hand-drawn jellyfish illustrations, which was especially fitting because jellyfish are some of my favorite creatures and they often appear in my own artwork. (Ruth is a book artist and illustrator living in Cape Cod. To see more of her work, visit her etsy shop or her blog.)

I know I've mentioned before that my husband loves maps. (He couldn't resist getting one of the East Nashville maps at Porter Flea a few weeks ago.) So for his paper gift last year, I got him a silkscreened world map from These Are Things. We also own their map of Europe, so between all of these we have quite the map theme developing in our home decor. 


This year, the theme was cotton. Tony picked out a bird pillow for me, which is now adding a lively splash of color in our new living room. The pillow was made by Janae Easton of Platypusfile, who I met back in May at the Athens Indie Craftstravaganzaa. Each of her bird pillows is made from vibrant fabrics and a vintage button, and each one is named after an opera singer. My bird's name is Josella Ligi. 

I got my husband two cotton t-shirts from Out of Print. I settled on the To Kill a Mockingbird and The Catcher in the Rye shirts, because I liked their designs best, they are some of our favorite classic novels, and because we read them together in high school back when we first started dating. The shirts from Out of Print are based on book cover designs, and with each shirt sale they donate a book to a community in need. 


Next year our theme will be leather. I've already got my eye on these lovely handmade leather bags...

Read more...

Congratulations, Jaclyn and Ryan!

>> Saturday, July 30, 2011


While working on this custom wedding guest book, I realized that I had a lot in common with the couple.  Just like my husband and I, Jaclyn and Ryan are high school sweethearts.  They started dating when they were 17, and when they finally decided to tie the knot their guests were absolutely ecstatic.  

As Jaclyn and I chatted back and forth planning out the design for her book, we also enjoyed comparing notes about our relationships and noting how refreshing it is to meet someone else who met their partner at such a young age.  The couple also lives in Chicago, just about a half hour away from where Tony and I grew up.  


Jaclyn and Ryan were married in a rose garden, and they selected a rose theme for their invitations.  I based the design of the personalized nameplate off of the same imagery to unify the look of all of their wedding paper goods.  

The couple chose red and Tiffany blue as their wedding colors, so I used a red lokta paper for the covers of this book and then used a beautifully textured blue paper for the guards (the pieces of paper that wrap the sections of pages and are visible along the spine of the book) and for an accent on the book's cover. 


I'm thrilled that Jaclyn loved the way the book turned out as much as I did, and I'm glad I was able to make a keepsake for the wedding of two high school sweethearts. 

Read more...

Packing for the art show

>> Friday, July 29, 2011


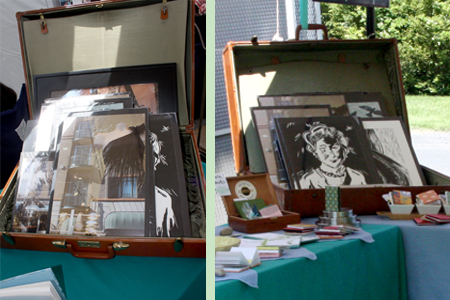
Artists may exhibit their handmade wares in "trunk shows," but the suitcase is the real darling of art show booths. The bigger the clasps -- and the brighter the stitching -- the better. Serving as Katie's heavy box lifter, snack gopher, and bookkeeper (as the tax department refers to me) it's this sort of acute observation that I bring to the table for linenlaid&felt. I'm Tony, the newspaper reporter husband, and in this exclusive guest blog post, I bring you a special trendspotting story. 


The suitcase photo that leads off this post comes direct to you from Porter Flea, a handmade market that debuted in East Nashville this month. Although not immediately involved in the displaying of crafts, its presence alone adds style to the whole affair. I am, of course, only half joking. I really do like the style of vintage suitcases, but I'm not totally sold on the best way to use them.

The pictures immediately above hail from the Athens Indie Craftstravaganza in May. The quadruple stack was something new to me, practically a monument dedicated to the indie art show suitcase. Joking aside (sort of) both of these photos show off what happens to be the most beguiling part of the suitcase: the bunchy and silky interior divider. From the first time we considered using a suitcase, that interior has always given me pause. That area is designed for storing socks, I think, and making it practical for anything else may not be possible.


This photo shows another Athens effort in putting the suitcase to work. Such displays really are handy for browsing, even if I haven't yet met a suitcase that can pull off "classy." Which is not to say that we haven't given the suitcase a chance as well, as seen below, displaying prints and photographs.

For the moment, this is the best that we've come up with. When hauling art to our booth, I love being able to easily carry considerable weight inside the suitcase. And once it's there, I think we feel obliged to work it into the display in our own booth.

We got ours for no cost at a church "free sale" back in Virginia, so there's no pressure, but I'd like to see your great ideas for putting a vintage suitcase to work, so please share links or descriptions in the comments.

Read more...

A gift from her bridesmaids

>> Thursday, July 28, 2011

This book will be making its debut at a wedding in upstate New York this weekend.  The cousin of the bride contacted me about placing the order for this custom photo album, and it will be a wedding gift to the couple from her and the other bridesmaids.  The bride's cousin also designed the wedding invitation suite, so she supplied the artwork for the custom nameplate on this album so it would coordinate with all of the other printed materials. 


Like all of my albums, this book is built with a double-thick spine.  This allows for photos to be added to the pages without the book "yawning" open or appearing over-filled.  I bound the album with orange waxed linen thread in the Japanese stab binding style.  

I selected a light blue bookcloth for the edge of the book closest to the spine, and I used a navy paper for the covers.  I actually ended up gluing a slightly transparent piece of navy paper on top of a blue lokta paper to get exactly the shade of blue I wanted for the covers.  


I wish Anne and Kevin a joyous wedding day and a lifetime full of happiness.  Congratulations to you both!

Read more...

  © Blogger templates Shiny by Ourblogtemplates.com 2008

Back to TOP